Today’s look was inspired by the Cheshire Cat from Alice in Wonderland. Various cat looks are some of the most popular looks for Halloween and I decided to take a little more animated take on the traditional cat look.
products used:
nivea mens shave balm
milani conceal and perfect foundation – 02 natural
maybelline age rewind concealer – neutralizer
coty airspun loose powder – translucent
makeup geek eyeshadow – americano, corrupt
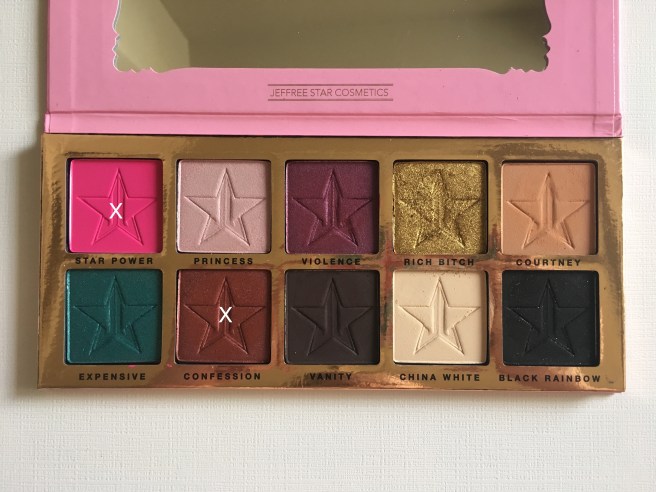
jeffree star beauty killer palette
nyc liquid eyeliner
wet n wild color icon blush – apri-cot in the middle
bobbi brown gel definer liner – black
mac gigiblack mascara
ardell lashes – 202
duo brush on lash glue
make up for ever flash palette
step 1: prime – I applied nivea mens shave balm to smooth my skin and prolong my foundation wear
step 2: foundation – I used milani conceal and perfect to have a full coverage base.
step 3: concealer – I used maybelline age rewind concealer to cover my dark circles and highlight my chin, cupids bow, bridge of nose, and center of forehead.
step 4: powder – I packed coty airspun under my eyes to set my concealer and dusted the powder over the rest of my face so that it didn’t budge.
step 5: blush – I added wet n wild blush on the apples of my cheeks sweeping up towards the temples to create some dimension on my face.
step 6: eyeshadow – I used JS star power to create an outline of a winged out crease. I drew a line from my inner corner, slightly above my natural crease, and curved it towards the tail of my brow with a thin brush. I used the same brush to bring the end of that wing down below my lower lash liner and curved it downward before it touched my tear duct. I filled in the entire outlined area with star power but I wanted a little dimension so I added confession in the upper crease.
step 7: liner – I used my favorite NYC liquid liner to create a huge drawn out wing that followed the one I created with the shadow. This liner has a super thin brush so I was able to bring it in and create the downward facing inner corner of a cats eye. I used my bobbi brown liner to fill in my waterline.
step 8: mascara – mac gigiblack mascara is my go to for darkening my lashes before falsies because it still looks natural enough to blend with lashes.
step 9: false lashes – I used ardell 202 lashes for this look because they have the winged out effect I wanted to amplify. I like the duo brush on lash glue because it is so easy to apply it evenly on the lash band without a mess. I let it dry for about 30 seconds before actually putting them on my eyes so that they are tacky enough. I press them against my real lashes with tweezers so that you can’t see a distinction line.
step 10: brows – I used the black shade from MUF flash palette to fill in my brows and I really feathered the lines above my natural eyebrow for a furry sort of effect. You could use any sort of gel liner or shadow for a black eyebrow.
step 11: mouth – To begin the mouth , I used the black from the MUF flash palette to make a sharp cupids bow and a curved smile line. I finished the outline by connecting the two ends of the smile. I filled in the entire mouth area with the black and then did a second outline slightly inside the black with the white from the palette. I then just drew in a series of triangles t0 create the teeth.
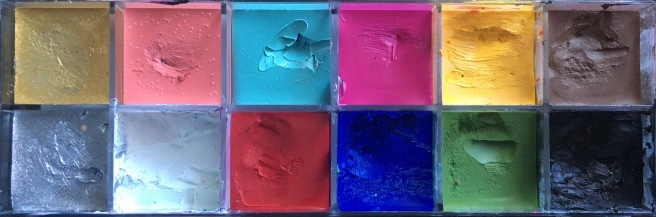
step 12: nose – I put a little bit of the black from the MUF palette on my nose and when I blended it in it turned slightly grey but I liked it so I left it that shade. I drew tiny lines with the black for the whiskers.
step 13: fur – I used a makeup sponge to blend JS star power on the edges of my face to create ‘fur-like’ appearance.
here’s the completed look again:

I am providing pictures of some of the products so that you can find similar products and colors in your own collections! These are just the products I use but you can substitute in anything really and still look fierce. If any of you recreate these looks please tag me in them so I can see all your beautiful faces!! Ill be back tomorrow with another halloween look. Don’t forget to check back!
love & lipstick kisses💋
