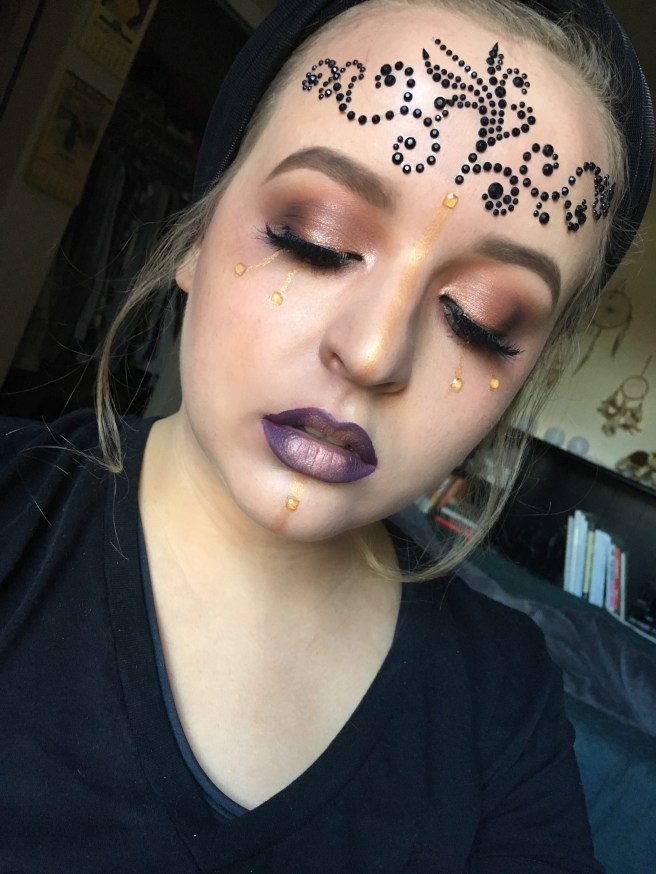
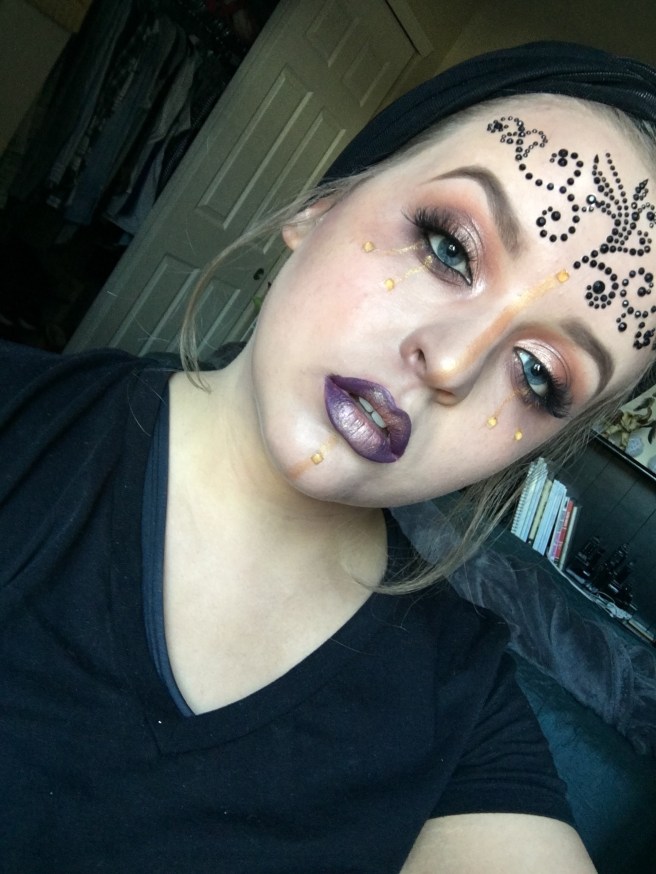
This may just be my favorite look so far. I am absolutely obsessed with the way it came out and it is super easy!!
products used:
make up for ever step 1 primer – smoothing
mac strobe cream
doll ten hydra foundation – light
mac pro longwear concealer – NW20
nars paloma blush duo
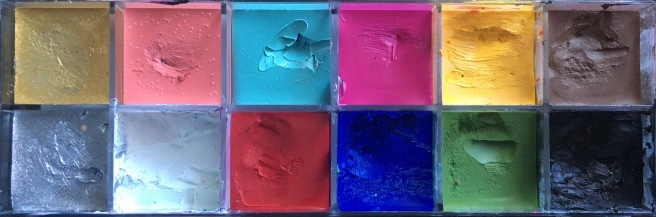
make up for ever flash palette
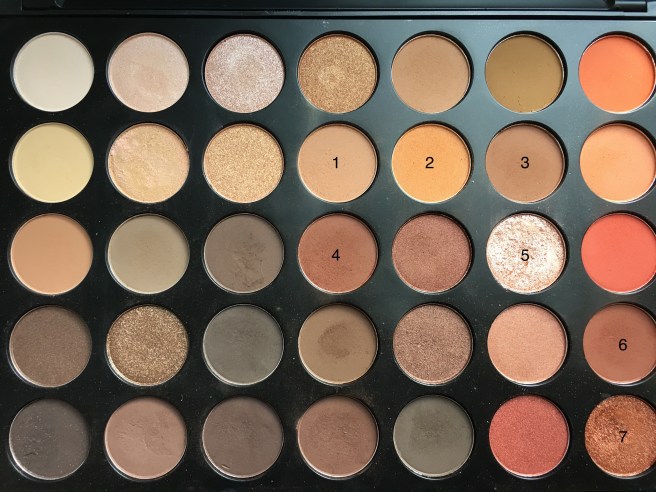
morphe eyeshadow palette – 35N, 35O
mac gigiblack mascara – black
anastasia beverly hills waterproof creme color – jet
ardell lashes – 251
duo brush on lash glue
ofra long last liquid lipstick – fifth ave
nyx liquid suede lipstick – stone fox
anastasia beverly hills liquid lipstick – craft
kylie cosmetics metal liquid lipstick – heir
michaels rhinestones
step 1: prime – I primed with MUF smoothing primer to ensure my foundation went on smooth and lasted all day. I then applied mac strobe cream all over my face to give myself a glow.
step 2: foundation – I used the doll 10 foundation for a full coverage hydrated base.
step 3: concealer – I wanted a really full coverage concealer so I used mac pro longwear and applied that all over my under eye and lid areas. Mac pro longwear acts as a really good eyeshadow primer and it covers any veins.
step 4: powder – I set my concealer with the light yellowish shade from the nars paloma duo
step 5: shading – I wanted to look slightly bruised and battered so I used the red, brown, and black from the MUF flash palette with a beauty sponge and tapped it around my face especially around my eyes which I wanted to look like they were healing from a black eye almost. I set those areas with the deep shades in the morphe 35N.

step 6: shadow – I started by blending shades 1 and 2 all over the entire crease area. I then took 3 and 4 a little lower in the crease and curved it around to the lower lash. I deepened the outer v using shade 6. I packed shade 7 all over the lid and then 5 on the inner 1/2 of the lid. I smudged the shades from the 35n to really make the lower lash purple and bruised looking.
step 7: liner – I didn’t apply liner to the lash line but with the deepness of the bruising around the eyes I didn’t like my waterline being bare so I applied abh jet in my upper and lower waterline.
step 8: mascara – mac gigiblack mascara is my go to for darkening my lashes before falsies because it still looks natural enough to blend with lashes.
step 9: false lashes – I used ardell 251 lashes. I like the duo brush on lash glue because it is so easy to apply it evenly on the lash band without a mess. I let it dry for about 30 seconds before actually putting them on my eyes so that they are tacky enough. I press them against my real lashes with tweezers so that you can’t see a distinction line.
step 10: rhinestones – For the black rhinestones on my forehead, I used cut up some scrapbooking stickers to create a design. If you go to michaels there are tons of sticker sets that would look great with this look. If you plan on wearing it all night I would apply some liquid latex or lash glue or elmers glue onto the forehead before you lay down the stickers so they don’t budge. I knew I wanted gold tears so I used brush and ofra fifth ave lipstick to create the tears and gold lines on my face. The gold rhinestones were also from michaels and I used a little lash glue on the back before placing them on the gold lines with tweezers.
step 11: lips – I wanted deep purple matte lips into a coppery ombre. I started by mixing abh craft and nyx stone fox on my mixing palette and applying it all over the lips with a lip brush. I then patted kylie’s metal heir lipstick in the center to add some metallic to the ombre I was trying to achieve.
heres the completed look again:


I am providing pictures of some of the products so that you can find similar products and colors in your own collections! These are just the products I use but you can substitute in anything really and still look fierce. If any of you recreate these looks please tag me in them so I can see all your beautiful faces!! Ill be back tomorrow with another halloween look. Don’t forget to check back!
love & lipstick kisses💋
