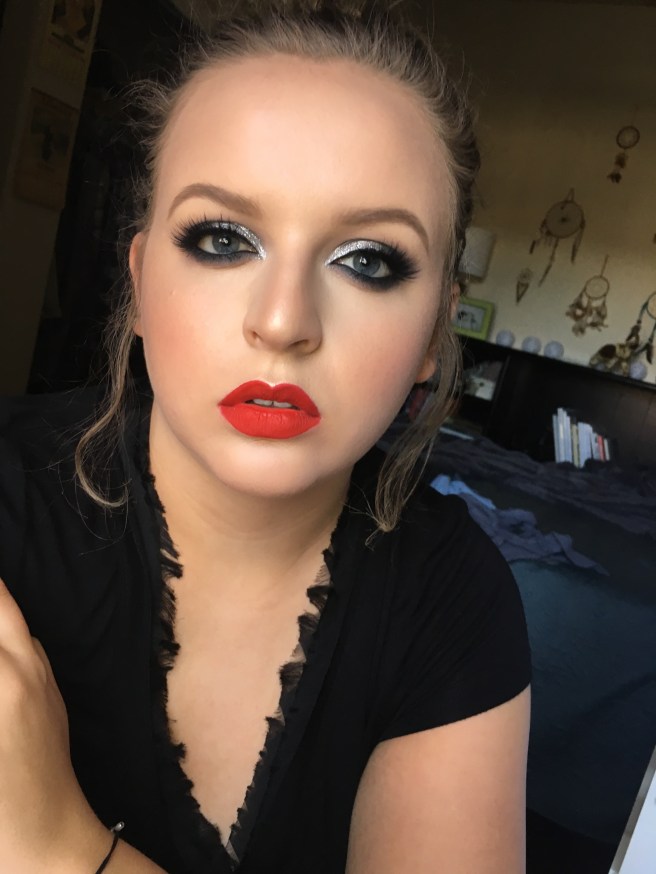
For my sexy maid look, I decided to do a classic glam that would be appropriate for any “sexy” costume! I created a sultry silver smokey eye with a red lip that will go perfectly for all of your costumes or nights out!
Products used:
nivea men’s shave balm
makeup forever stick foundation – Y225
l’oreal pro glow foundation – 202
cle de peau concealer – ivory
urban decay naked skin concealer – fair
anastasia beverly hills contour powder – banana
mac pro shaping powder – emphasize
dolce & gabbana the blush – tan
marc jacobs airblush blush – kinks & kisses
the balm mary lou manizer
smashbox photo finish shadow primer
lorac pro mega 3 palette
anastasia beverly hills shadow – stone
makeup geek shadow – barcelona beach
melt cosmetics shadow – dark matter
nars dual intensity shadow – lysithea
nyx liquid crystal liner – crystal silver
anastasia beverly hills dip brow pomade – taupe
anastasia beverly hills clear brow gel
anastasia waterproof creme color – jet
nyc liquid eyeliner – black
mac gigiblack mascara – black
lena lashes – bianca
duo brush on lash adhesive
mac lip liner – cherry
stila all day liquid lipstick – beso
step 1: prime face -I applied nivea shave balm to ensure smooth foundation and long lasting base.
step 2: apply foundation – I used both the MUF and L’oreal because I wanted a really full coverage doll like skin look.
step 3: apply concealer – I used the cle de peau under my eyes to cover my dark circles and the urban decay concealer to highlight under my eyes as well as the center of my face.
step 4: set concealer – I used the banana powder and emphasize powder to prevent creasing and provide a little highlighting in the center areas of my face.

step 5: contour – the d&g blush is the perfect color for light to fair girls to contour with because it is so cool toned. I contoured my cheekbones, forehead, and nose to create sharp angles and slim along the edges of my face.
step 6: blush – I applied a heavy amount of blush to create really rosy cheeks. I wanted to draw a lot of attention to the apples of my cheeks and create the illusion of blushing for a sultry look.

step 7: highlight – I used mary lou manizer because it gave me a strong highlight without drawing attention away from the eyes. It is also a perfect icy champagne tone that keeps the cheeks fairly neutral to the eye look you create.
step 8: prime eyes – I love the smash box primer because of how well it holds my shadow but any sort of base or concealer to ensure your shadow doesn’t crease is perfect.
step 9: apply shadow – I started by applying custard from lorac all over the lids to create an even base. I then blended ABH stone throughout the whole crease to transition. Then I used a slightly smaller brush to blend MUG barcelona beach in the lower crease area. Next I used a bullet brush to begin to darken the lower crease and outer corner with lorac ash. I began packing melt dark matter into the outer corner. I recommend taking this really slowly and using as little product as possible then building up as you go. The biggest mistake with black shadow is applying too much. Its way easier to add more pigment than to try and remove or blend away too much. I also took dark matter into the upper lid area and blended in windshield wiper motions. Then I applied lysithea with a wet brush over the inner 2/3 of my lid. I packed lorac olivine on top to give it more shimmer but it still wasn’t as glittery as I wanted so I brushed some nyx crystal silver over the shadow to give it more pop. I then used a flat liner brush to smugde dark matter under my lower lash line and used a pencil brush and ash to make it really smokey. Take your time with this step too because its easy to get frustrated but just keep blending!!


step 10: liner – I like to draw my wing with the nyc liner because its formula and brush don’t tug and can give you a really sharp line. I then use ABH jet t0 finish my liner because it is so pigmented and matte. I also apply it inside my waterline then set it with dark matter shadow
step 11: brows – I fill in my brows with ABH dip brow in taupe and set it with ABH clear brow gel.
step 12: mascara – mac gigiblack mascara is my go to for darkening my lashes before falsies because it still looks natural enough to blend with lashes.
step 13: false lashes – I used lena lashes in bianca for this look. I like the duo brush on lash glue because it is so easy to apply it evenly on the lash band without a mess. I let it dry for about 30 seconds before actually putting them on my eyes so that they are tacky enough. I press them against my real lashes with tweezers so that you can’t see a distinction line.
step 14: lips: I lined my lips with mac cherry lip liner and smudged it inside of my lips. I then applied stila liquid lipstick in beso over my whole lip area and a little over my natural lip line.
here’s the final product again:

I am providing pictures of some of the products so that you can find similar products and colors in your own collections! These are just the products I use but you can substitute in anything really and still look fierce. If any of you recreate these looks please tag me in them so I can see all your beautiful faces!! Ill be back tomorrow with another halloween look. Don’t forget to check back!
love & lipstick kisses💋

Reblogged this on mherrera1.
LikeLike
Hi! I enjoy reading your posts and have nominated you for the Real Neat Blog Award! You can check it out here: https://lsbeauties.wordpress.com/2016/10/14/real-neat-blog-award/
LikeLike