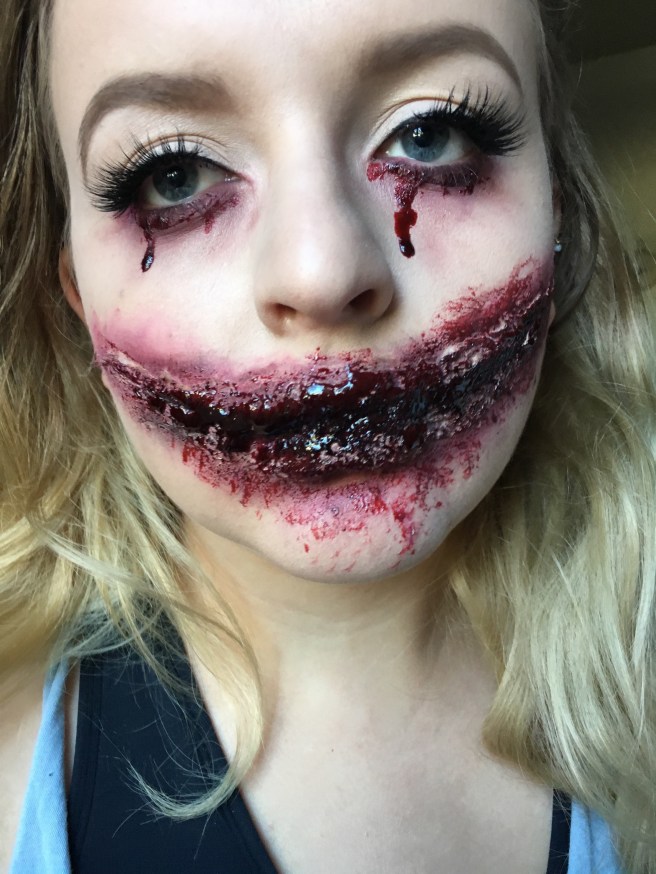
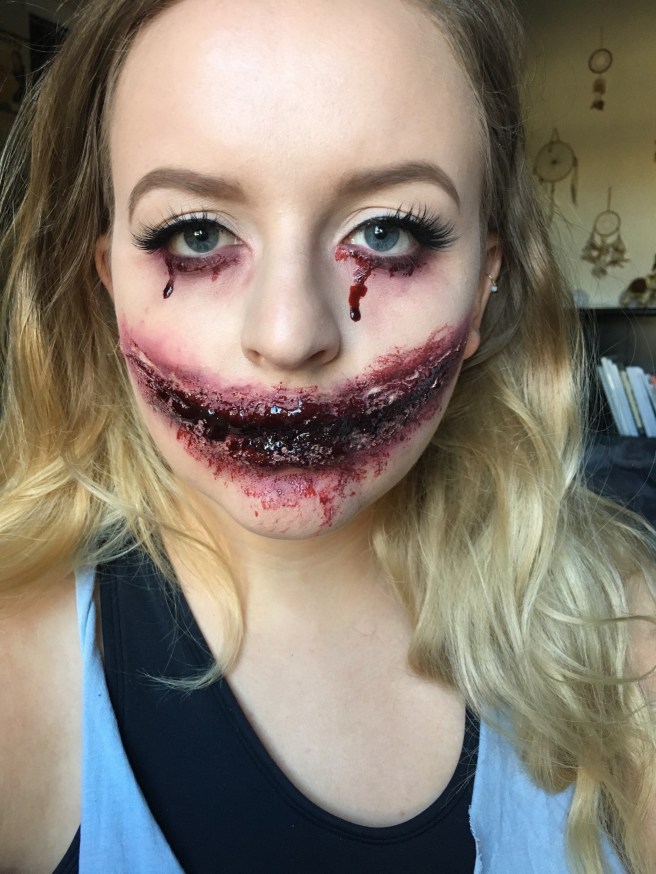
I knew I wanted to do a look with a really disgusting bloodied mouth. I decided to add a really sad bruised eye. I wanted to convey suffering and pain so I decided to name it tortured soul.
products used:
nivea mens post shave balm
rimmel lasting finish 25 hr foundation – 100 ivory
sephora gel serum concealer – 01 bavarian cream
mac pro shaping powder – emphasize
coty airspun loose powder – translucent
anastasia beverly hills dipbrow pomade – taupe
anastasia beverly hill clear brow gel
colourpop brow pencil – dope taupe
anastasia beverly hills waterproof creme color – jet
mac gigiblack mascara – black
lena lashes – bianca
duo brush on lash glue
morphe eyeshadow palette – 35N
make up for ever flash palette
graftobian liquid latex
cinema secrets blood gel
step 1: prime – I applied nivea mens shave balm to smooth my skin and prolong my foundation wear.
step 2: foundation – I used rimmel foundation for a really pale even base.
step 3: concealer – I applied sephora concealer under my eyes, down the bridge of my nose, on my eyelids, on my chin, and the center of my forehead.
step 4: powder – I used mac emphasize to set my under eye area and on my lids so my concealer wouldn’t crease. I then dusted coty airspun powder all over my face because I wanted a flat matte look.

step 5: brows – I filled in my brows with abh taupe dipbrow and then went back in with colourpop dope taupe liner to fill in the front and any sparse areas left. I set the brows with abh clear brow gel.
step 6: liner – I wanted a really classic winged eye look so I used abh jet to line my eyes and create a wing. When I use this product for a winged liner a put a drop of baby oil in it to make it really creamy. I wanted all the focus on my lower lash line so I only applied liner to the top.
step 7: mascara – mac gigiblack mascara is my go to for darkening my lashes before falsies because it still looks natural enough to blend with lashes.
step 8: false lashes – I used lena lashes in bianca for this look. I like the duo brush on lash glue because it is so easy to apply it evenly on the lash band without a mess. I let it dry for about 30 seconds before actually putting them on my eyes so that they are tacky enough. I press them against my real lashes with tweezers so that you can’t see a distinction line.
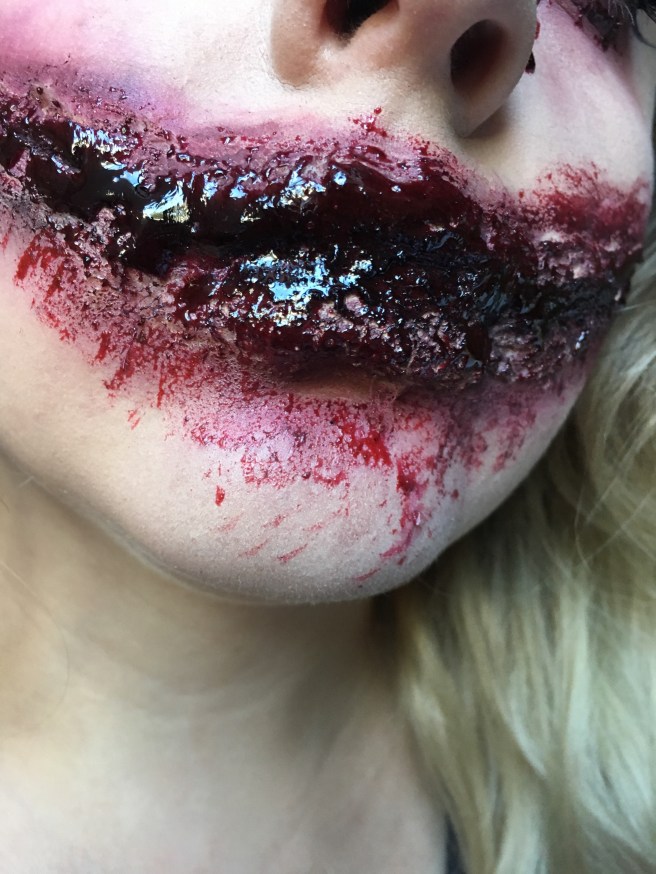
step 9: liquid latex – To create a kind of scar like, open tissue texture, I paint liquid latex on the area and then stick pieces of pulled apart cotton on top. I then apply another later of liquid latex and use my fingers to pull the latex apart and move it in varying directions to create texture. If you use varying pieces of thin cotton you will already get a lot of texture. I applied the liquid latex in a smile like shape across my whole lower face. If you plan on wearing this look out, make sure that once you put the liquid latex on you cut a slit with scissors where your mouth opens so you can talk or apply the liquid latex and cotton with your mouth slightly open so you don’t adhere it shut.
step 10: coloring – For the beginning of the bloody look you need to lay down a base of color. I start by putting foundation over the liquid latex area so that it blend with the rest of my makeup and no white shows through. I then take a sponge and use MUF flash palette to create a red area. I mixed the red, brown and black creams to begin to darken the ‘scars’. (The only reason I have the flash palette is because of this series. It is super expensive and unless you do fx makeup is not worth it. I would just use lipsticks. Thats what I did for my look last year and it worked perfectly.) I then used a mixture of cool browns, burgundys, and reds from the morphe 35n palette to create a bruising effect. Once I got the look dark enough, I used a beauty sponge to pat on blood gel over the whole latex area until I got the blood level I desired.

step 11: lower lash line – I used the exact same colors from the morphe 35N to blend some red darkness under the eyes. I then took a really small precision brush to apply a little blood gel under my eyes. Be careful and be warned that it is super sticky so if you don’t want that then just go with the shading.
here’s the completed look again:

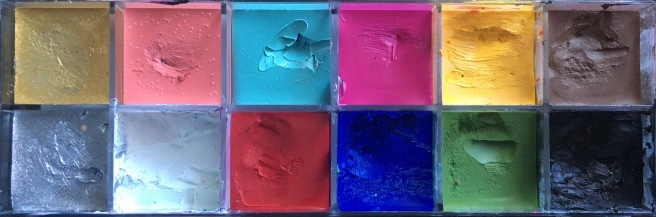
I am providing pictures of some of the products so that you can find similar products and colors in your own collections! These are just the products I use but you can substitute in anything really and still look fierce. If any of you recreate these looks please tag me in them so I can see all your beautiful faces!! Ill be back tomorrow with another halloween look. Don’t forget to check back!
love & lipstick kisses💋

Reblogged this on mherrera1.
LikeLike